

What SmartCal does
When someone fills in the demo form on your website, SmartCal shows them a calendar straight away. There's no "we'll be in touch". It works in three steps:
- It picks the right person. Your routing rules decide who should take the demo, for example by country or company size.
- It shows real availability. The prospect sees open times from that person's own calendar and picks one.
- It books the meeting. The meeting goes on that person's calendar with a video link, and the prospect gets the invitation.
Demo form on your website → SmartCal picks the right person → Prospect picks a time → Meeting booked
Your prospects never need a SmartCal account, and your salespeople don't need one either. Only the people who manage SmartCal sign in.
Who's who
| Who | What they do in SmartCal |
|---|---|
| Admin | Signs in and manages everything: users, routing rules, settings, website setup and team access. |
| Viewer | Signs in to look at bookings, routing rules and history, but can't change anything. |
| User | Someone SmartCal books meetings for, usually a salesperson. Users don't sign in. They connect their calendar (and Zoom, if you use it) once, from a setup link. |
| Prospect | The person asking for a demo. They never sign in. |
Tip: In SmartCal, "Users" always means the people who take meetings. The people who sign in to manage SmartCal are called members, and you manage them under Team access.
Signing in
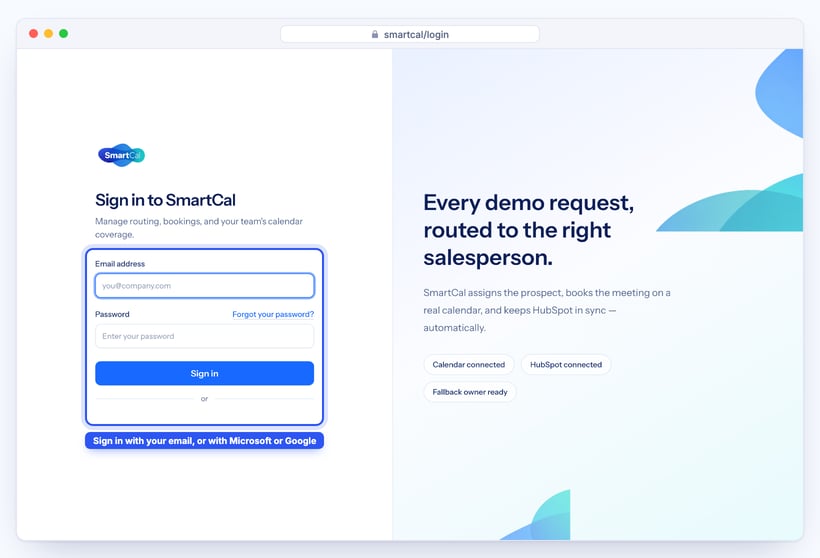
When someone invites you to SmartCal, you get an email with a link to set your password. After that, sign in at the SmartCal sign-in page with your work email and password, or with the Microsoft or Google button if your company uses them.
To change your name, time zone, password or two-factor authentication, open Admin → My account at the bottom of the left-hand menu.
Getting started: the Setup checklist
Until your workspace is live, SmartCal opens on the Setup checklist. It lists everything that needs to be in place before prospects can book. Each step checks the real state of your workspace, so it turns green on its own once the step is done.
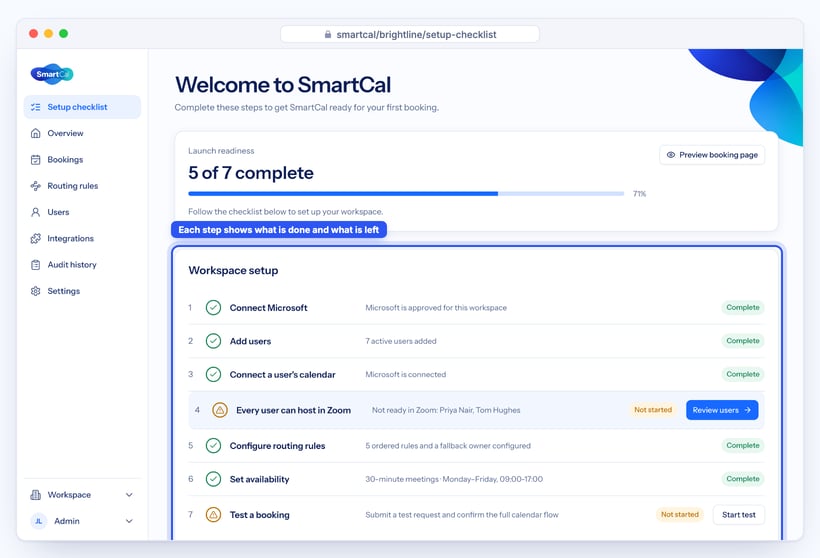
| Step | What "done" means | Where to do it |
|---|---|---|
| Connect Microsoft (Microsoft 365 workspaces only) | SmartCal is approved for your Microsoft organisation. | Integrations |
| Add users | At least one person to book meetings for. | Users |
| Connect a user's calendar | At least one user has connected their calendar. | Their setup link |
| Every user can host in Zoom (only if you use Zoom) | Every user has connected their own Zoom account. | Their setup link. See the Zoom guide. |
| Configure routing rules | You have routing rules and a fallback owner. | Routing rules |
| Set availability | Working hours are set. | Availability |
| Test a booking | You booked a test meeting from start to finish. Start test sends the invitation to your own email. | Setup checklist |
When all seven steps are complete, click Activate SmartCal. From that moment, your booking step takes real bookings.
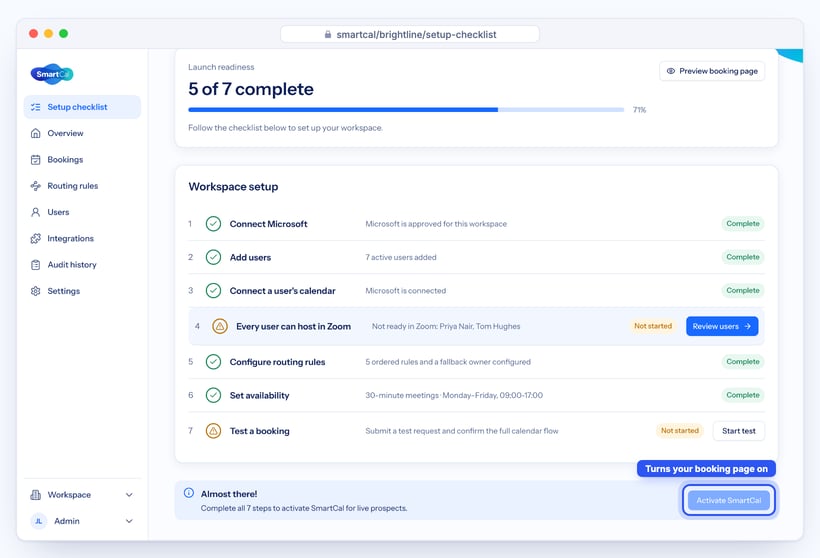
Need to pause? Settings → Booking settings → Workspace status → Manage lets you deactivate SmartCal. Existing bookings are not affected.
Overview
The Overview page shows how your demo flow is doing. Use the buttons at the top right to switch between the last 7, 30 or 90 days.
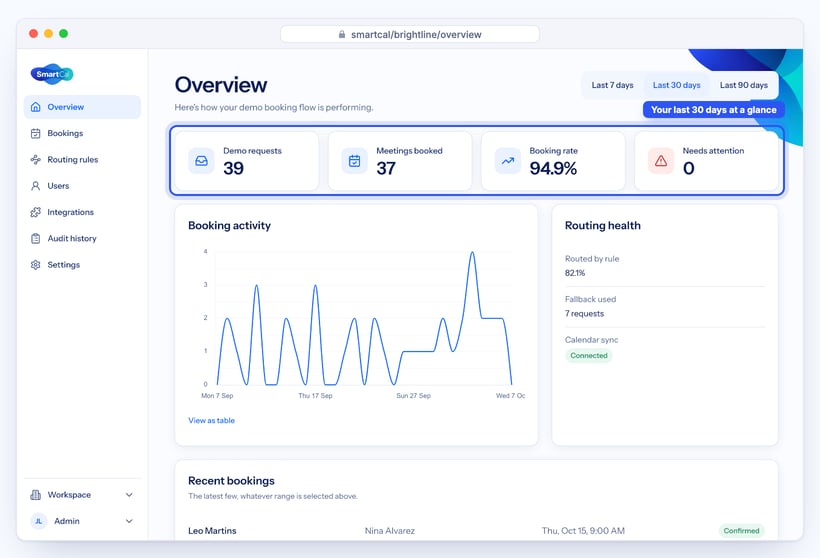
- Demo requests: how many people filled in your demo form.
- Meetings booked: how many of them picked a time.
- Booking rate: the share of demo requests that became meetings.
- Needs attention: problems a person has to fix, such as a user whose calendar stopped working. Each one links to where you can fix it.
- Booking activity: requests per day. Click View as table to see the numbers.
- Routing health: how many requests matched one of your rules, how many went to the fallback owner, and whether calendars are connected.
- Recent bookings: the latest meetings. Click View all bookings for the full list.
Users: the people you book meetings for
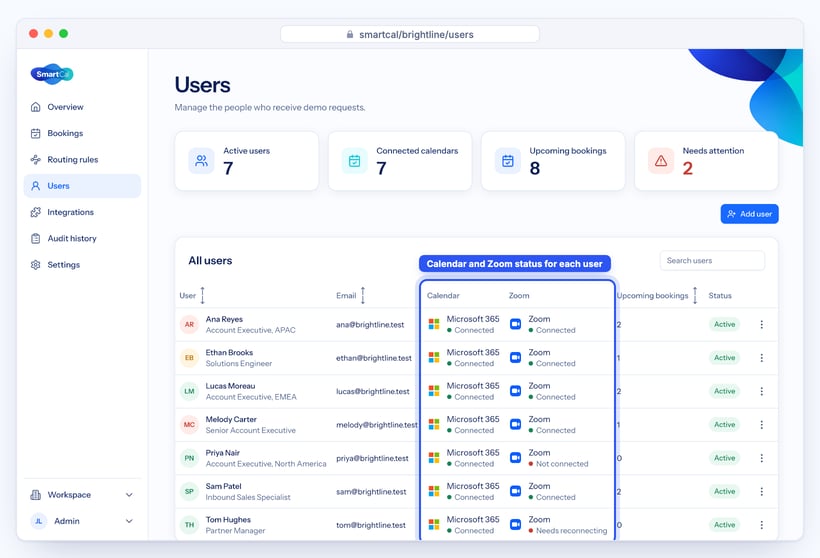
Go to Users to see everyone SmartCal books meetings for, and whether each person's calendar (and Zoom) is connected.
Add a user
- Click Add user.
- Enter their Full name, Email (it must be an address at your company's domain) and Title. The title is shown to prospects.
- Optionally upload a Photo. Prospects see it on the booking step; without one they see the person's initials.
- Choose their Time zone. Working hours are read in this time zone.
- Click Add user.
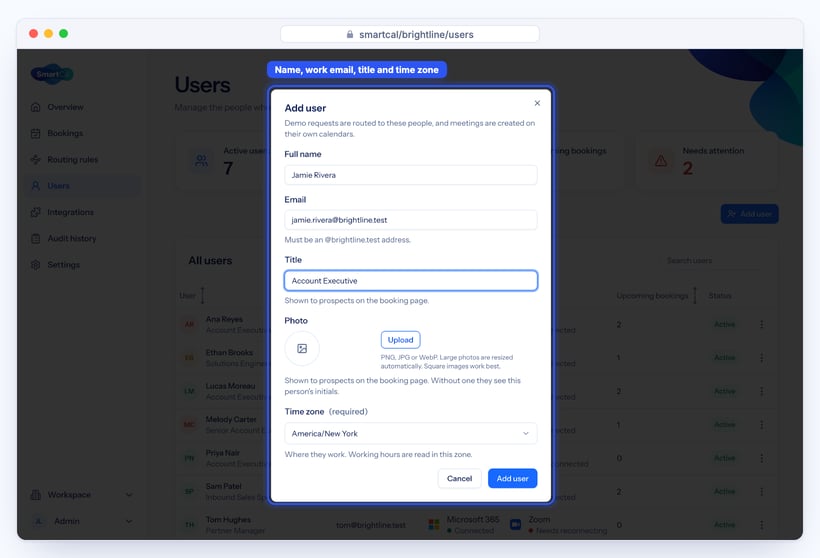
SmartCal immediately emails the new user a setup link.
Send or copy a setup link
The setup link is how a user connects their calendar (and Zoom, if you use it). They don't need a password or an account.
- On Users, click the ⋯ menu at the end of the person's row.
- Choose Send setup email to email it again, or Copy setup link to paste it into a chat or email yourself.
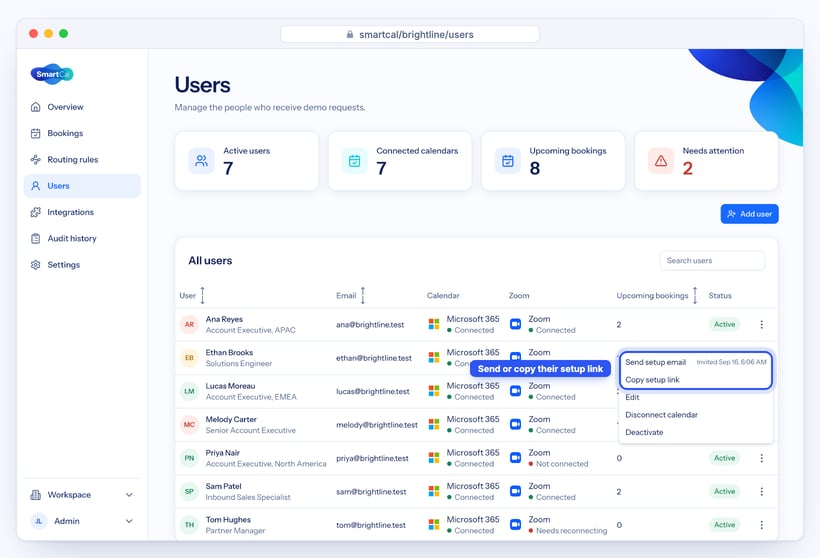
Note: A setup link works for 7 days. If it has expired, send or copy a new one.
What the user sees
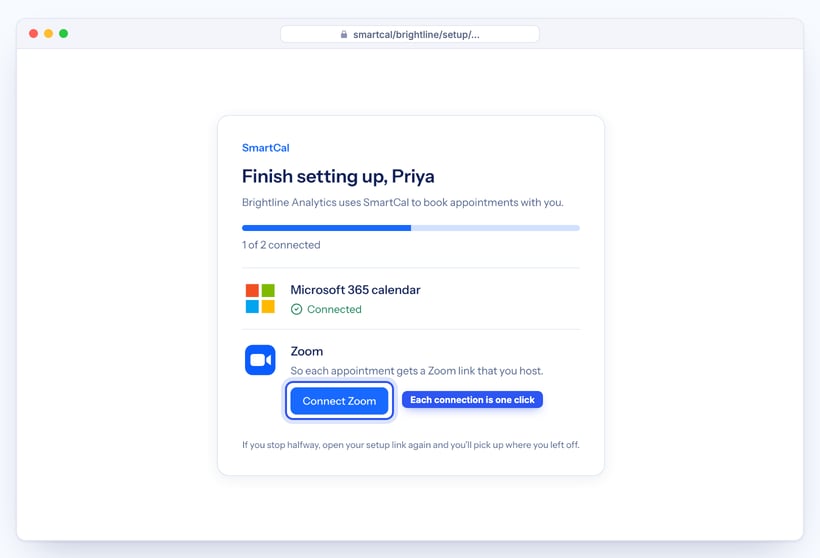
When the user opens their link, they see a short checklist: their calendar, and Zoom if your workspace uses it. Each connection is one click, followed by their usual Microsoft, Google or Zoom sign-in. If they stop halfway, they can open the same link again and pick up where they left off.
Reading the Users table
- Calendar: Connected means SmartCal can see their free and busy times and add meetings. Anything else needs fixing before they can be booked.
- Zoom (only if you use Zoom): Connected, Not connected, or Needs reconnecting.
- Status: Active, Needs attention or Inactive.
Change, pause or remove a user
From the ⋯ menu you can also:
- Edit their name, title, photo or time zone.
- Disconnect calendar or Disconnect Zoom.
- Deactivate: stop booking new meetings with them. Their email address stays reserved, and you can Reactivate them later.
- Delete: remove them completely. Their upcoming meetings move to your fallback owner, and SmartCal lets those prospects know. A meeting that can't be moved (for example, because the fallback owner is busy) appears under Bookings → Needs a new owner.
Routing rules: who gets each demo
Routing rules decide which user gets each demo request. Go to Routing rules.
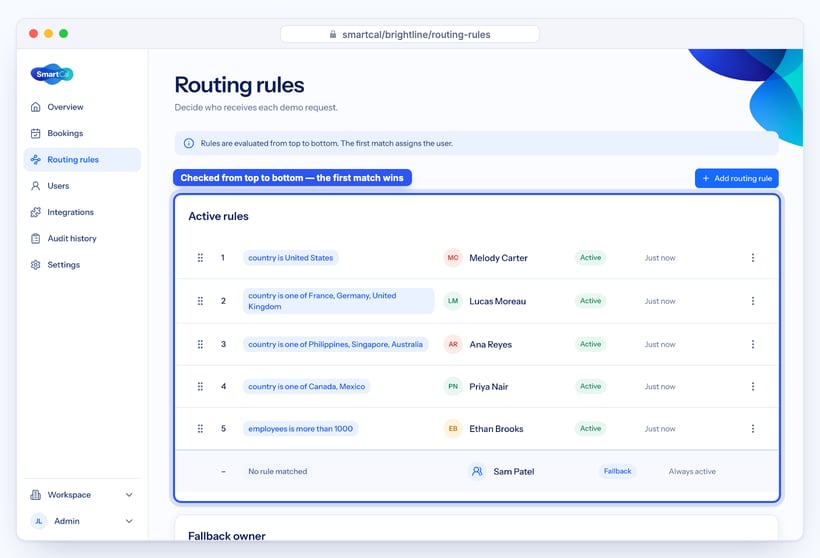
How rules work:
- SmartCal checks your rules from top to bottom, and the first rule that matches decides who gets the demo.
- A rule matches when all its conditions match.
- If the prospect left a question blank, a condition about that question never matches. The request moves on to the next rule.
- If no rule matches, the demo goes to your fallback owner.
- If the matching user can't take meetings right now (for example, they're deactivated, or they haven't connected Zoom yet), the demo also goes to the fallback owner, so no prospect is turned away.
Example:
| Order | If… | Then… |
|---|---|---|
| 1 | country is United States | Melody Carter |
| 2 | country is one of France, Germany, United Kingdom | Lucas Moreau |
| 3 | country is one of Philippines, Singapore, Australia | Ana Reyes |
| 4 | country is one of Canada, Mexico | Priya Nair |
| 5 | employees is more than 1000 | Ethan Brooks |
| — | nothing matched | Fallback owner: Sam Patel |
A request from a 5,000-person company in Germany goes to Lucas, not Ethan, because rule 2 comes first.
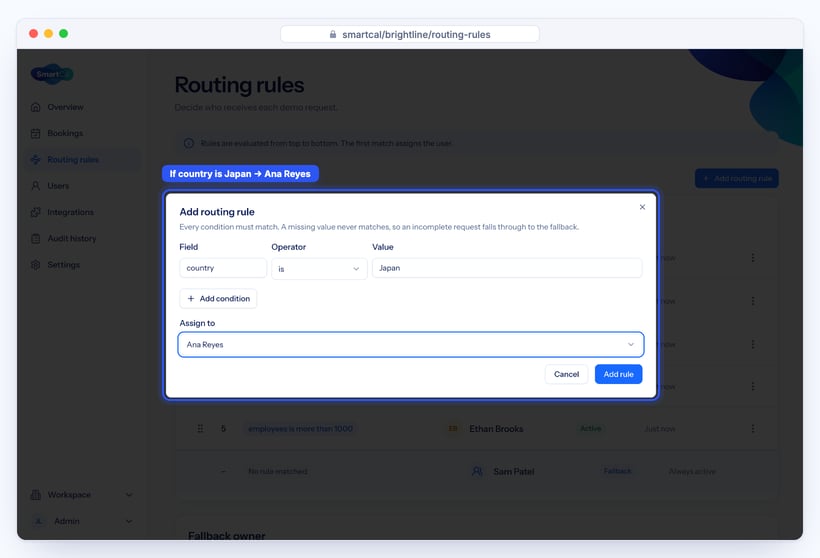
Add a routing rule
- Click Add routing rule.
- In Field, type the name of the question on your demo form, for example
countryoremployees. It must match the field name your form uses (see Check your form's field names). - Choose an Operator: is, is not, is one of, is not one of, is more than, or is less than.
- Enter the Value. For is one of, add each value separately.
- Optionally click Add condition to require more than one thing, for example country and company size.
- Under Assign to, choose the user.
- Click Add rule.
Change the order: drag a rule by its handle (⋮⋮), then click Save order. The new order only takes effect once saved.
Edit, pause or remove: use the ⋯ menu on a rule to Edit, Deactivate, Activate or Delete it.
Set the fallback owner
The fallback owner gets every demo request that no rule matches. You must choose one before SmartCal can book a request that doesn't match a rule. Choose a person and click Save fallback.
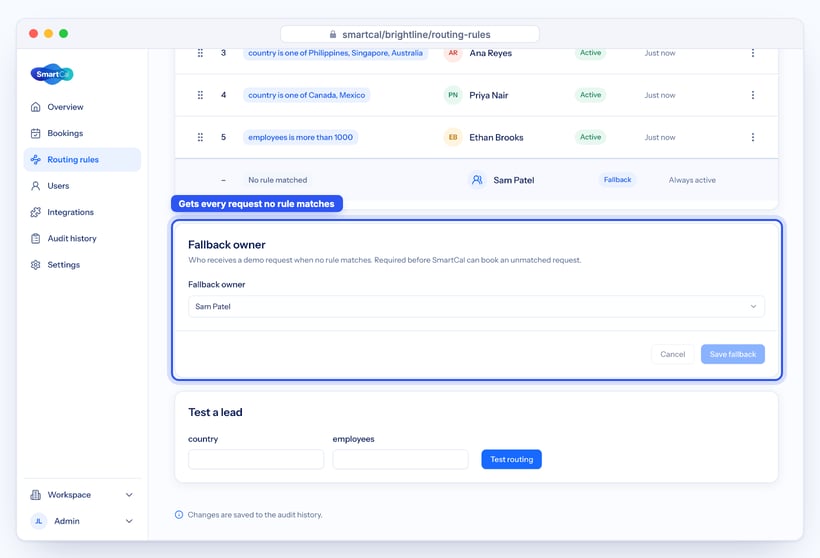
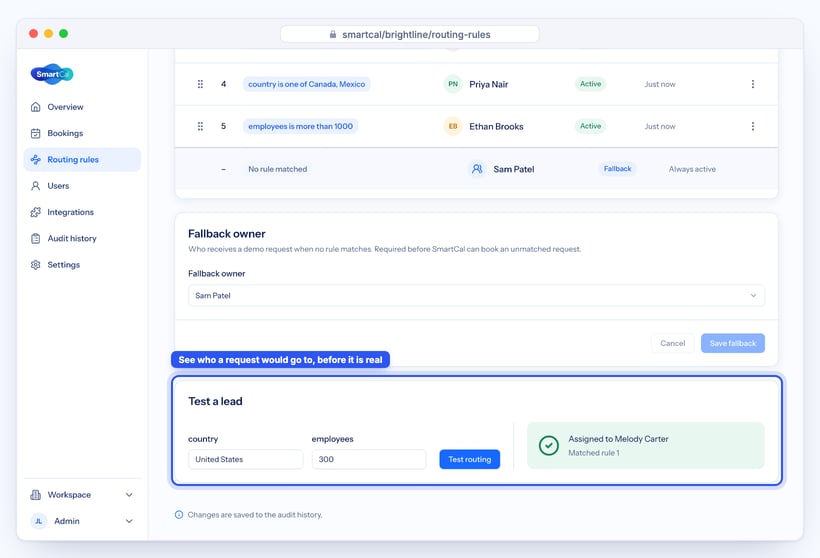
Test a lead
Not sure who a request would go to? Under Test a lead, type in example answers (the boxes match the fields your rules use) and click Test routing. SmartCal shows which rule matched and who would get the demo. Nothing is booked.
Every change to routing rules is recorded in Audit history.
Booking settings
Go to Settings → Booking settings to choose what kind of meeting prospects can book.
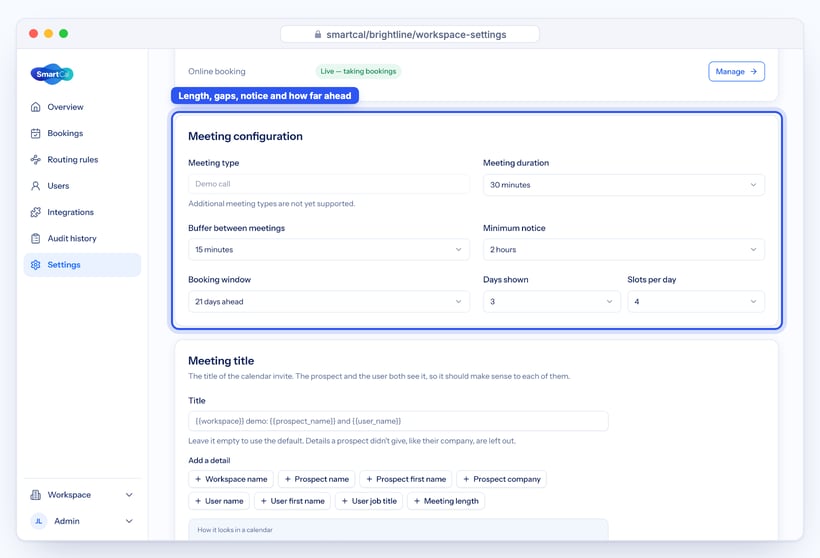
| Setting | What it does | Options |
|---|---|---|
| Meeting duration | How long each demo lasts. | 15, 30, 45, 60 or 90 minutes |
| Buffer between meetings | A gap kept free after each meeting. | None, 5, 10, 15 or 30 minutes |
| Minimum notice | How soon a prospect can book. "2 hours" means nobody can book a slot starting within the next 2 hours. | 30 minutes, 1, 2, 4 or 24 hours |
| Booking window | How far ahead prospects can book. | 7, 14, 21, 30 or 60 days |
| Days shown | How many days the booking step shows at once. | 1–7 |
| Slots per day | The most times shown for each day. | 1–12 |
Meeting title: the title of the calendar invitation, which the prospect and your user both see. Click the Add a detail buttons to insert things like the prospect's name or company. How it looks in a calendar shows an example. Leave it empty to use the default.
Booking experience:
- Show assigned user: show prospects who they'll meet, with their name, title and photo.
- Allow rescheduling and Allow cancellation: let prospects change or cancel their meeting from the link in their invitation.
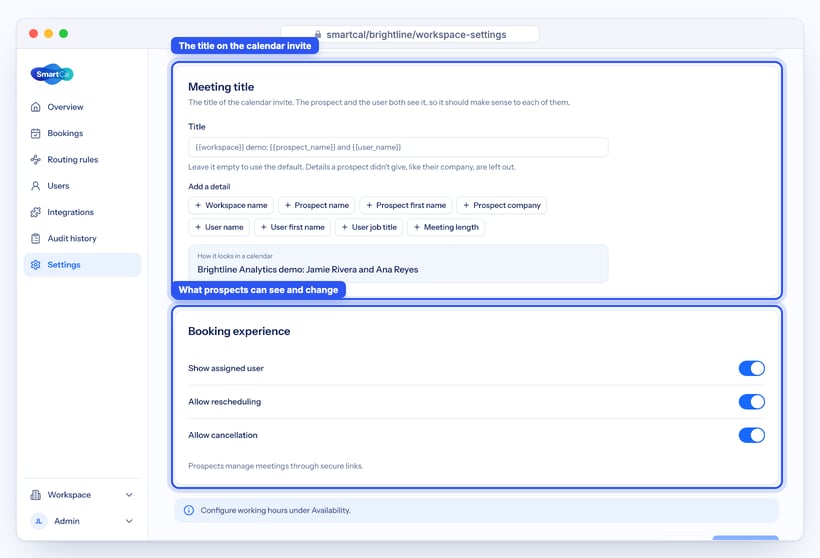
Click Save changes when you're done.
Availability
Go to Settings → Availability.
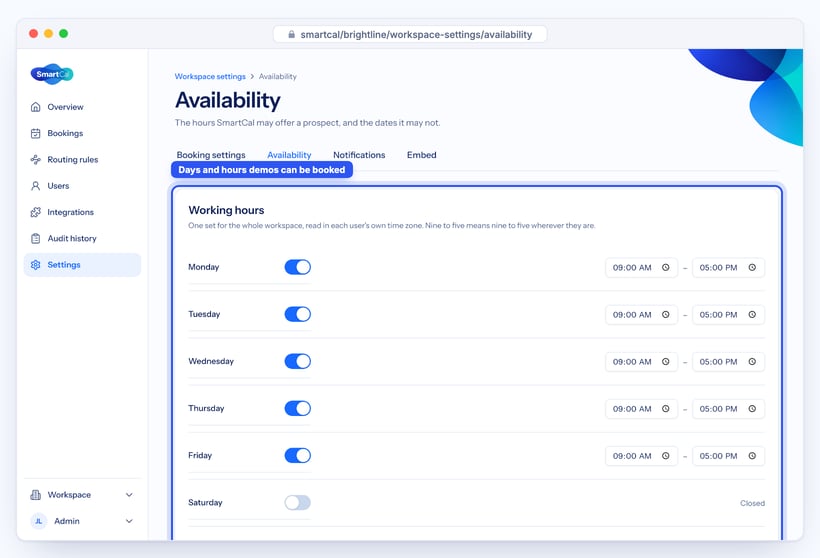
- Working hours: turn each day on or off and set its start and end times. There's one set of hours for the whole workspace, applied in each user's own time zone. "9 to 5" means 9 to 5 wherever each person works.
- Availability exceptions: use Add a closed date for company-wide days off, such as public holidays. Nobody can be booked on those days.
SmartCal also checks each user's own calendar, so meetings, holidays and personal time off they've put in their calendar are never offered to prospects. There's nothing to enter in SmartCal for personal leave.
Notifications
Go to Settings → Notifications.
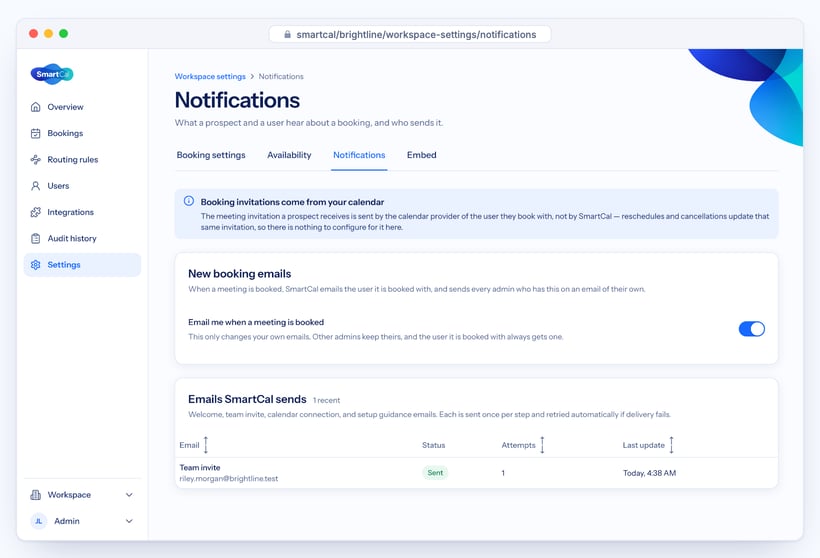
- Booking invitations come from your calendar: the invitation a prospect receives is sent by your user's own calendar, not by SmartCal. Reschedules and cancellations update that same invitation.
- Email me when a meeting is booked: switch this on to get an email for every new meeting. It only changes your own emails. The user who is booked always gets one.
- Emails SmartCal sends: a list of the emails SmartCal sent (welcome emails, team invitations, calendar connection and setup emails), with their status. If one failed, Admins can click Retry.
Putting SmartCal on your website
Go to Settings → Embed. This is done once, usually with the help of whoever manages your website.
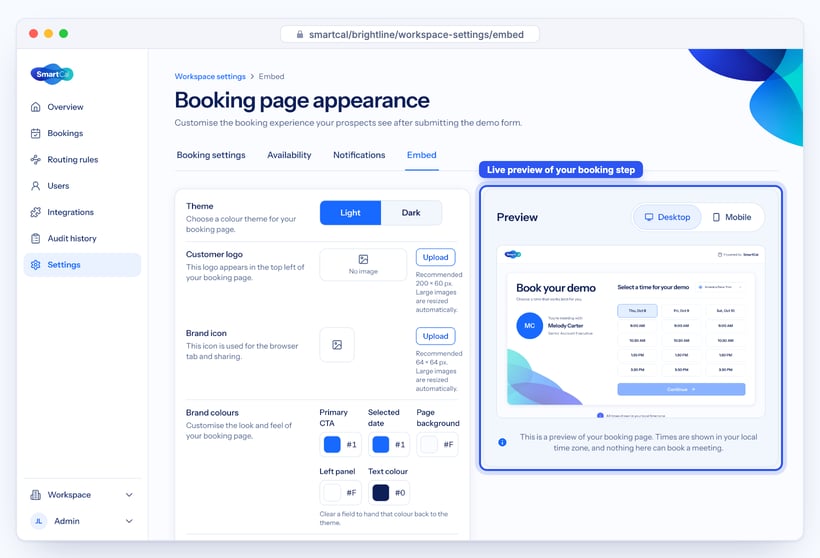
Booking page appearance
Make the booking step look like your brand:
- Theme: Light or Dark.
- Customer logo and Brand icon.
- Brand colours: buttons, the selected date, page background, left panel and text.
- Copy: the headline, supporting text and button text.
- Supporting image: an optional picture in the left panel.
The Preview on the right updates as you go, on desktop or mobile. Click Save changes, or Preview booking page to see it full size.
Install on your website
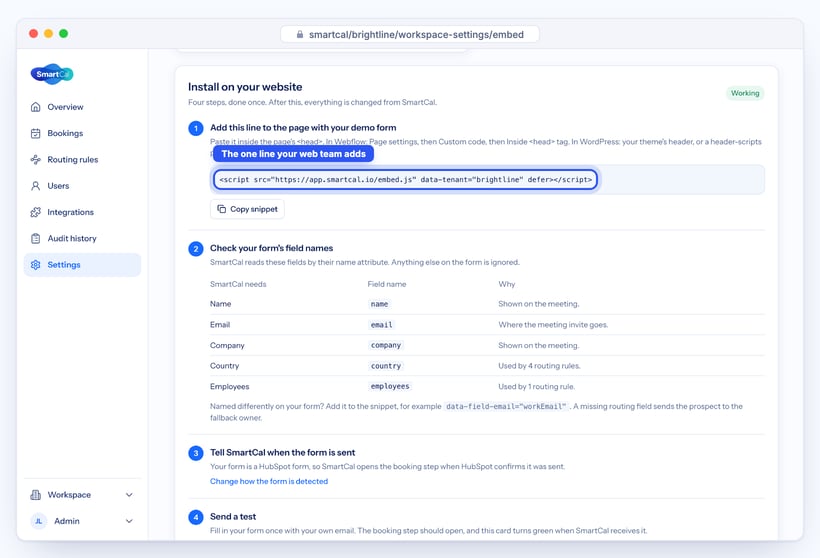
Install on your website walks you through four steps:
- Add this line to the page with your demo form. Click Copy snippet and give it to your web team. It goes inside the page's
<head>. Instructions for Webflow and WordPress are shown on the page. - Check your form's field names. SmartCal reads your form's name, email and company, plus any fields your routing rules use (such as country). If your form names a field differently, the page shows how to tell SmartCal, for example
data-field-email="workEmail". - Tell SmartCal when the form is sent. This is set under When the booking step opens (below).
- Send a test. Fill in your own form once. When SmartCal receives it, this card turns green and shows Working.
When the booking step opens
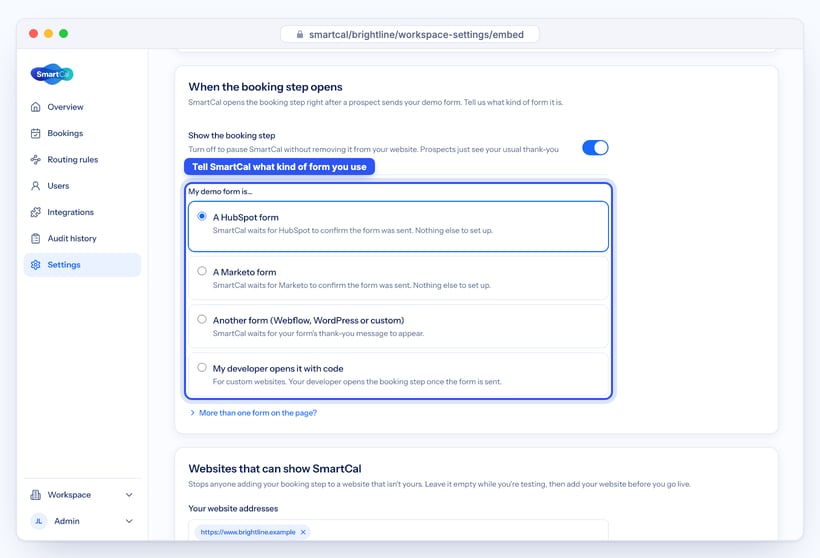
- Show the booking step: switch off to pause SmartCal without touching your website. Prospects just see your normal thank-you message.
- My demo form is… choose one:
- A HubSpot form (the most common). Nothing else to set up.
- A Marketo form. Nothing else to set up.
- Another form (Webflow, WordPress or custom). SmartCal waits for your form's thank-you message to appear.
- My developer opens it with code. For custom websites.
- More than one form on the page? tells SmartCal which one is your demo form.
Websites that can show SmartCal
Add your own website addresses here, so nobody else can show your booking step on their site. While you're testing you can leave it empty, which allows any website. Add your website before you go live.
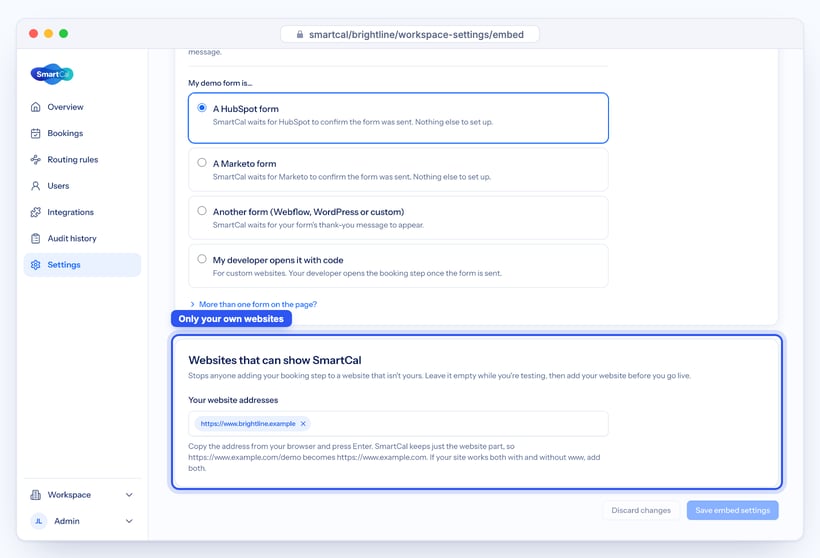
Click Save embed settings.
What your prospect experiences
Here's what happens from the prospect's side, from your demo form to a booked meeting.
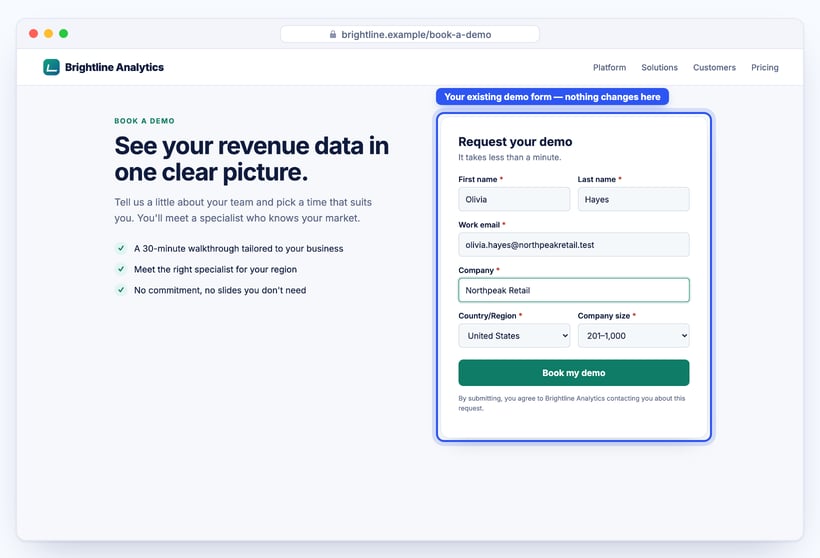
1. They fill in your demo form, exactly as they do today.
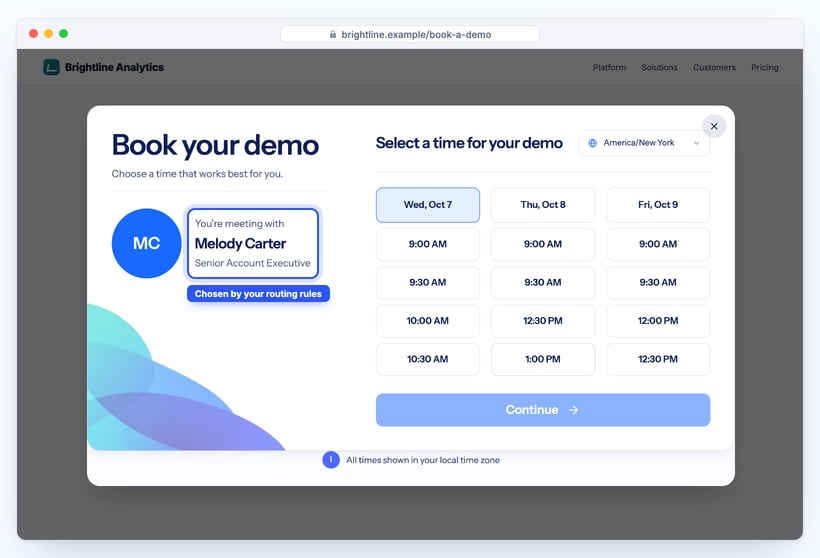
2. The booking step opens straight away. SmartCal has already applied your routing rules, so the prospect sees who they'll meet (if Show assigned user is on) and that person's open times. The prospect does not choose the salesperson.
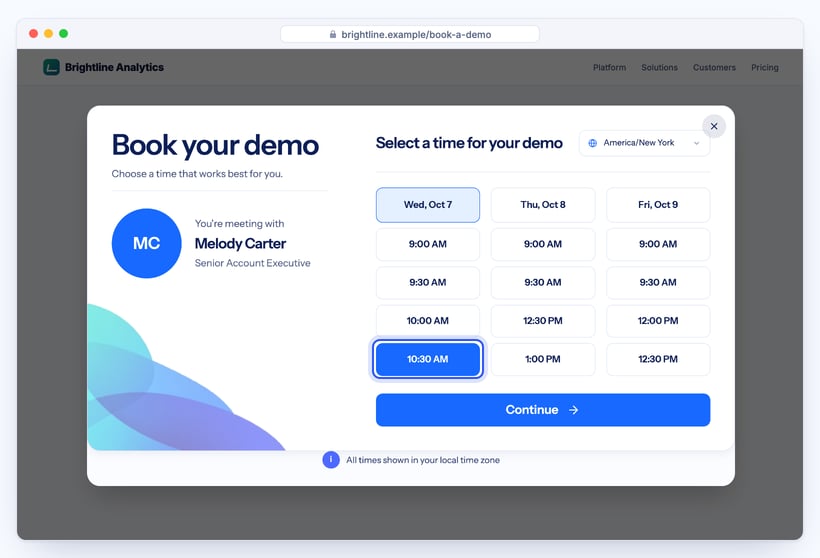
3. They pick a time. Times are shown in the prospect's own time zone, which they can change.
4. They confirm.
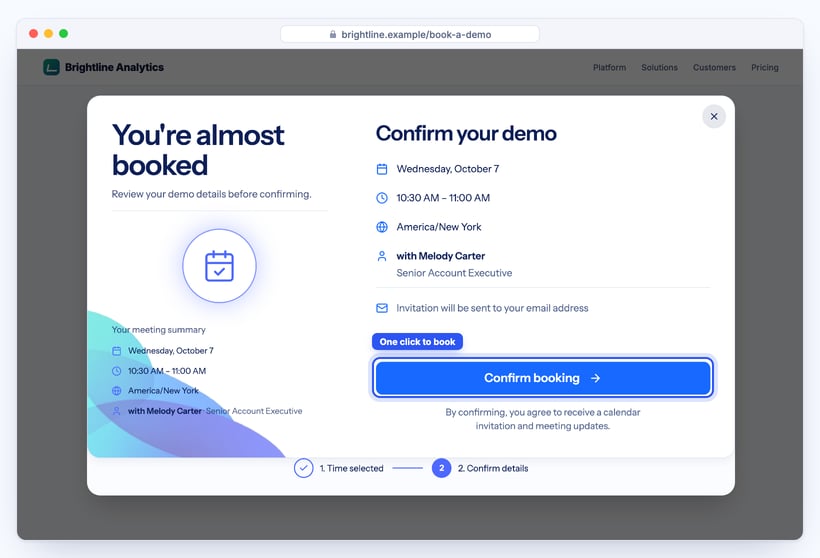
5. It's booked. The meeting is added to your user's calendar with its video link, and the calendar invitation goes to the prospect.
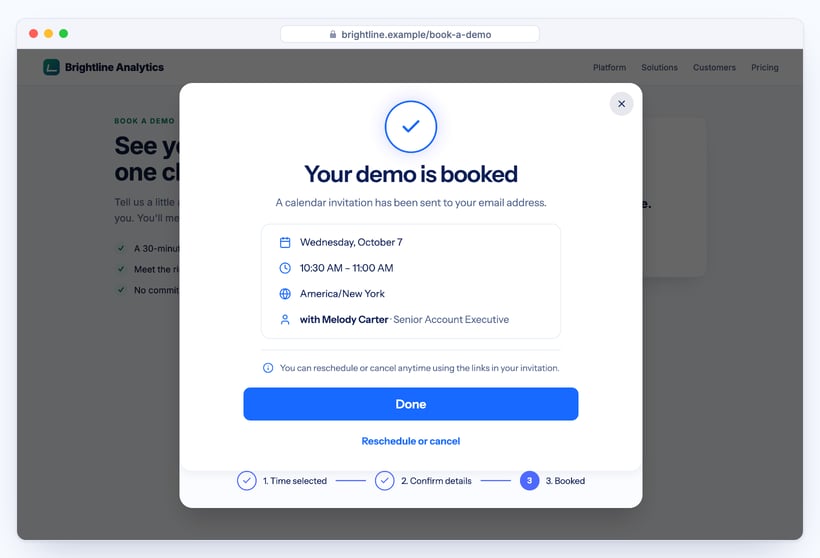
After booking:
- The prospect receives the calendar invitation from your user's calendar, with the video link and a link to reschedule or cancel. About an hour before the meeting, SmartCal emails them a reminder.
- The user gets an email about the new meeting, and so does every Admin who has switched on Email me when a meeting is booked.
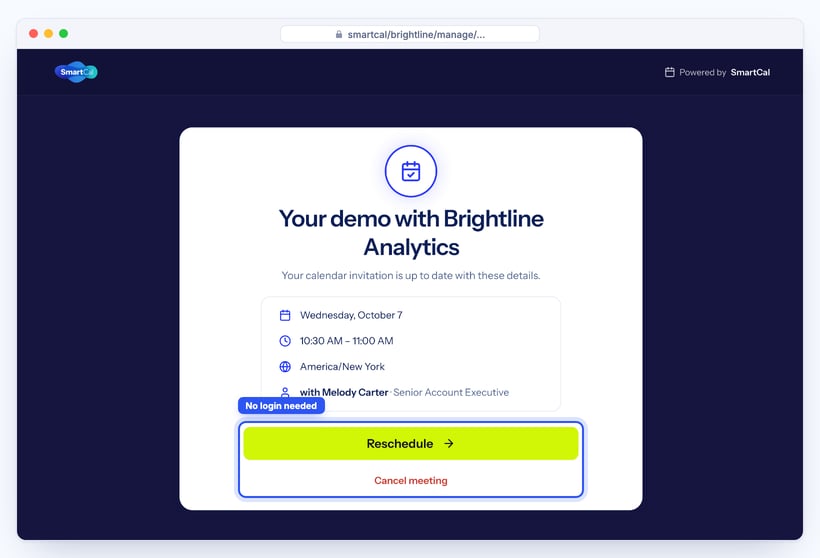
- If the prospect needs to change plans, the link in their invitation opens a page where they can Reschedule or Cancel meeting, with no account needed. (You can turn either option off in Booking settings.)
Bookings
Go to Bookings to see every demo request and meeting.
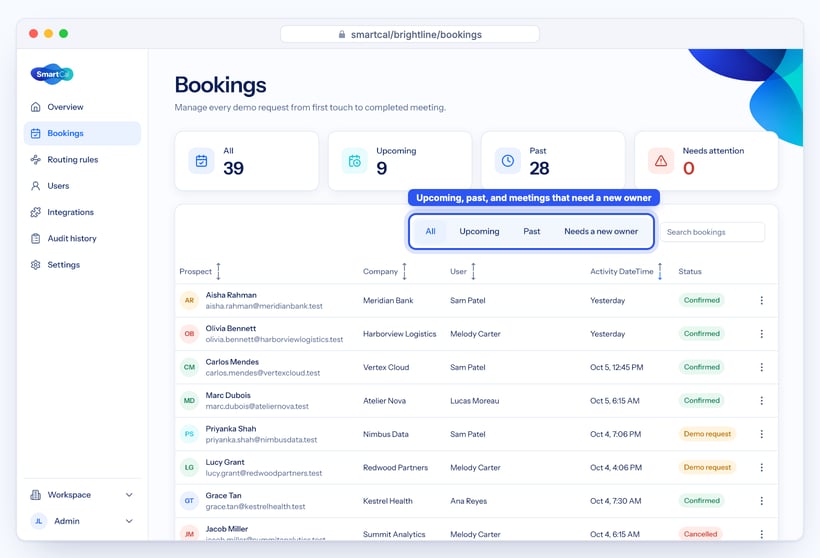
- Tabs: All, Upcoming, Past, and Needs a new owner (meetings whose user was deleted and that couldn't be moved automatically).
- Search and filters: find a prospect by name, email or company, or filter by user, status, or whether a rule matched or the fallback owner was used.
- Statuses:
- Demo request: the prospect filled in your form but hasn't picked a time yet.
- Confirmed: a meeting is booked.
- Rescheduled: the prospect moved it.
- Cancelled: the prospect or an Admin cancelled it.
- Completed: the meeting time has passed.
Click a booking (or ⋯ → View details) to open Booking details:
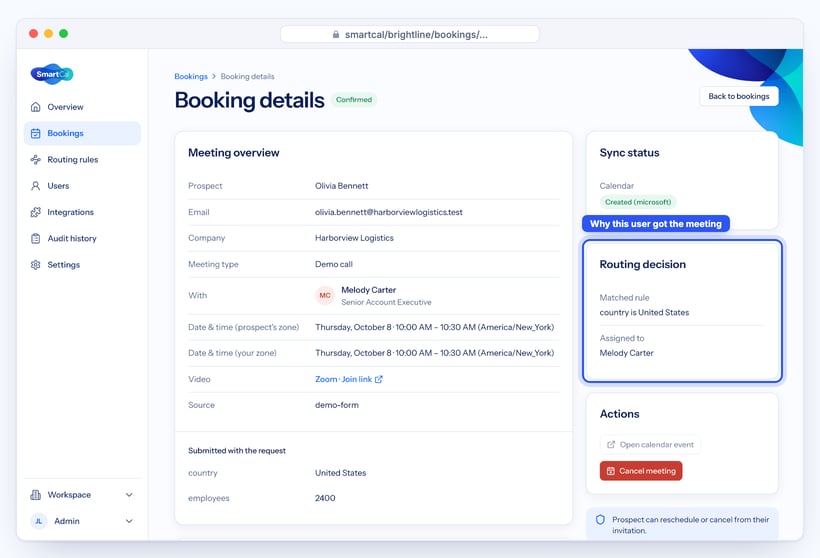
- Meeting overview: the prospect, the user, the time in both the prospect's time zone and yours, and the video link.
- Submitted with the request: the answers from your demo form.
- Routing decision: which rule matched, or why the fallback owner was used.
- Activity history: when it was requested, booked, rescheduled or cancelled.
- Actions: Admins can Cancel meeting. This also updates the calendar invitation.
Integrations
Go to Integrations.
-
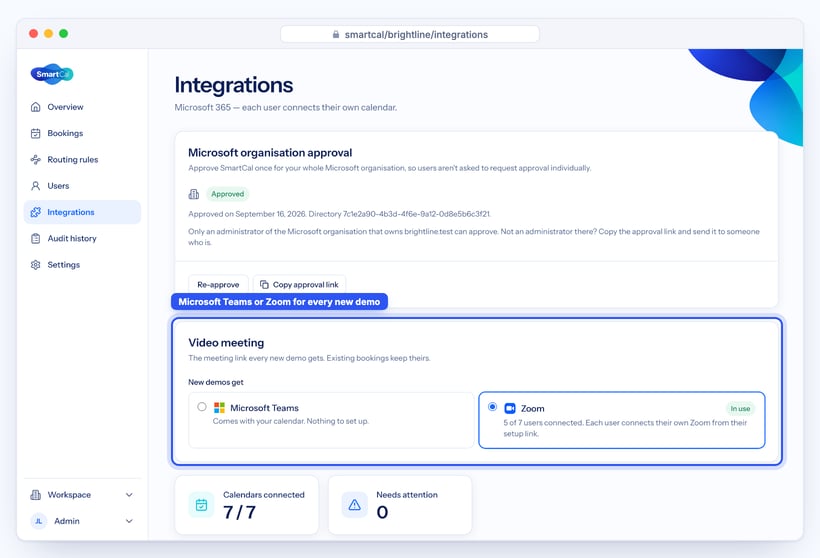
Microsoft organisation approval (Microsoft 365 workspaces): approve SmartCal once for your whole Microsoft organisation, so your users aren't each asked for approval. Only an administrator of your Microsoft organisation can approve. If that's not you, click Copy approval link and send it to them.
-
Video meeting: choose the meeting link every new demo gets:
- Microsoft Teams (or Google Meet, for Google workspaces), which comes with the calendar, with nothing to set up.
- Zoom, where each user connects their own Zoom account. See the SmartCal – Zoom Integration Guide.
Changing this only affects new demos. Existing bookings keep their link.
-
Calendars connected and Needs attention show whether any user's calendar needs fixing. Manage users takes you there.
Note: Which calendar your workspace uses (Microsoft 365 or Google) is set up by the SmartCal team when your workspace is created. Contact support if it needs to change.
Team access
Go to Workspace → Team access to manage who can sign in.
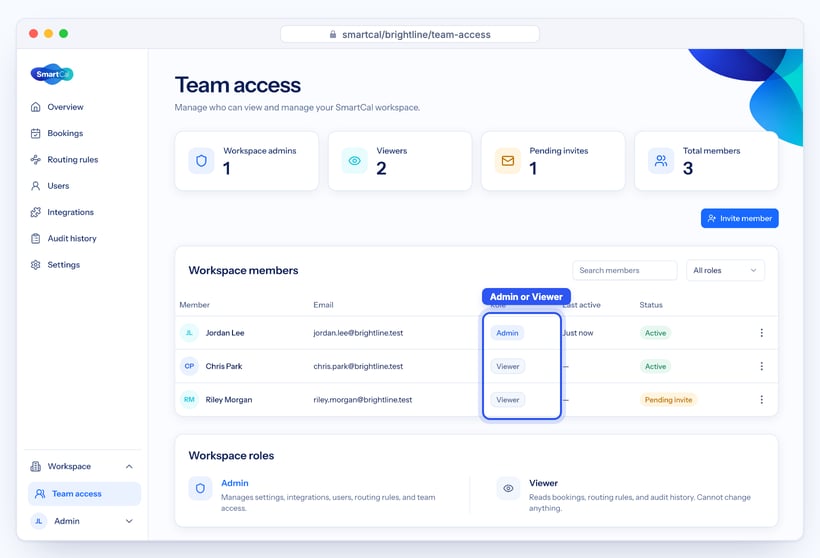
Invite someone:
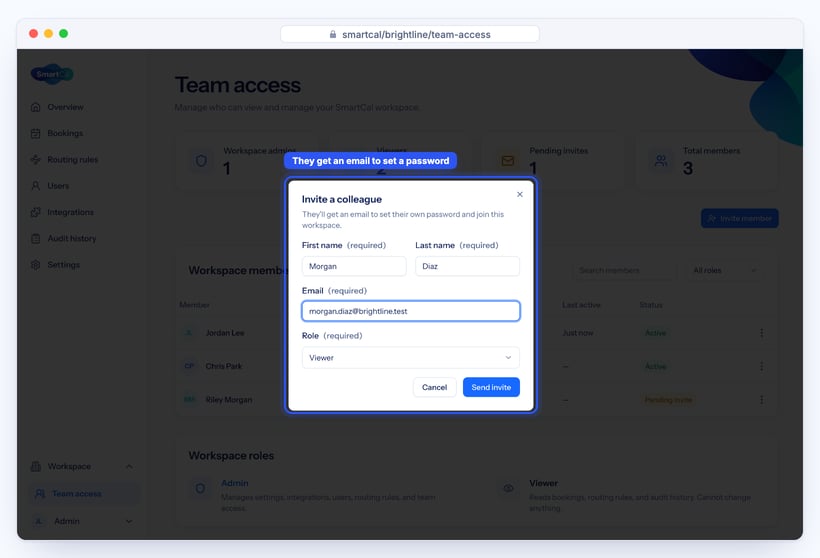
- Click Invite member.
- Enter their first name, last name and email, and choose a Role: Admin (can change everything) or Viewer (can look, but not change anything).
- Click Send invite. They get an email to set their own password, and show as Pending invite until they do.
To change someone's role or remove their access, use the ⋯ menu on their row: Make Admin, Make Viewer or Deactivate.
Audit history
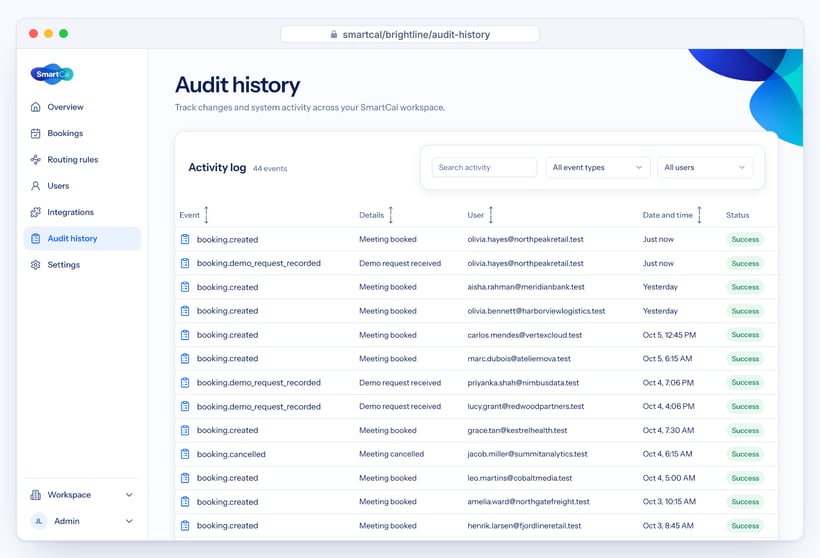
Audit history is a record of everything that happens in your workspace: each booking, reschedule and cancellation, every change to users, routing rules and settings, and who made it. Use the search and filters to find a specific event.
Troubleshooting
The booking step doesn't open after the form is sent
- Check that SmartCal is live: the Setup checklist is complete and Activate SmartCal was clicked.
- In Settings → Embed, check that Show the booking step is on, and that My demo form is… matches your form type.
- Check that your website is listed under Websites that can show SmartCal (or that the list is empty while testing).
- Use Send a test in Install on your website. If the card doesn't turn green, the snippet may be missing from the page. Ask your web team to check it's in the
<head>.
No times are shown
- Check Availability: are the working hours switched on for the coming days?
- Check Booking settings: a long Minimum notice or a short Booking window can leave few or no slots.
- Check Users: the assigned user's calendar must show Connected. A full calendar also means no free slots.
The wrong person got the demo
- Open the booking and look at Routing decision to see which rule matched.
- Remember that rules are checked top to bottom and the first match wins. Move the more specific rule higher, then click Save order.
- Make sure the Field in your rule matches the field name on your form exactly (for example,
country). - Use Test a lead to check the result before going live.
Demos keep going to the fallback owner
- No rule matched. Check the prospect's answers under Submitted with the request in Booking details.
- Or the rule's user couldn't take the meeting: they're deactivated, their calendar isn't connected, or (if you use Zoom) they haven't connected Zoom. Booking details explains which.
A user shows "Needs attention"
Their calendar (or Zoom) connection stopped working, for example because they changed their password or their access was removed. Send them a new setup link (Users → ⋯ → Send setup email) so they can connect again.
FAQ
Do prospects need a SmartCal account? No. Prospects book, reschedule and cancel without signing in.
Do our salespeople need to sign in? No. Each user connects their calendar once from their setup link. Only Admins and Viewers sign in.
Can the prospect choose who they meet? No. Your routing rules decide. The prospect only chooses the time.
What happens if nobody matches? The demo goes to your fallback owner, so no request is lost.
Does SmartCal change or delete events in our calendars? No. SmartCal only reads free and busy times and adds the meetings it books. It never changes or deletes your other events.
Who sends the meeting invitation? Your user's own calendar (Microsoft 365 or Google), so it comes from a real person at your company.
Can we use Zoom instead of Microsoft Teams? Yes. See the SmartCal – Zoom Integration Guide.
Can we pause SmartCal? Yes. Switch off Show the booking step in Settings → Embed to pause it on your website, or deactivate the workspace from Settings → Booking settings → Workspace status.
Glossary
| Term | Meaning |
|---|---|
| Workspace | Your company's SmartCal account. |
| User | Someone SmartCal books meetings for, usually a salesperson. |
| Member | Someone who signs in to SmartCal: an Admin or a Viewer. |
| Prospect | The person who asked for a demo. |
| Demo request | A filled-in demo form. It becomes a meeting when the prospect picks a time. |
| Booking step | The calendar that opens over your website after the demo form is sent. |
| Routing rule | A rule that decides which user gets a demo request. |
| Fallback owner | The user who gets any request no rule matches. |
| Setup link | The personal link a user opens to connect their calendar and Zoom. |
| Embed / snippet | The one line of code that puts SmartCal on your website. |
| Closed date | A company-wide day off when nobody can be booked. |
Contact support
For help with SmartCal, contact the SmartCal support team.
- Support: https://smartcal.org/support
- Email: privacy@srpro.marketing
- Privacy Policy: https://smartcal.org/policy
- Terms of Use: https://smartcal.org/terms-of-service