

Overview
SmartCal is a booking application that helps businesses turn demo requests into scheduled meetings. It routes booking requests to the appropriate salesperson, displays available appointment times, creates the corresponding calendar event, and provides the meeting information to the participants.
The SmartCal Zoom integration allows users to select Zoom as their video meeting provider for SmartCal bookings.
SmartCal supports either Microsoft Teams or Zoom as the selected video meeting application. Only one video meeting provider can be selected at a time.
This guide explains how to:
- Add and connect SmartCal with Zoom
- Configure Zoom as the video meeting provider
- Configure users and routing rules
- Create and verify Zoom-enabled bookings
- Disconnect Zoom
- Troubleshoot common issues
Adding and Setting Up SmartCal
Prerequisites
Before adding and configuring SmartCal with Zoom, make sure you have:
- A Zoom account.
- Access to the SmartCal application.
- A SmartCal user account with permission to manage the required integrations.
- Access to the calendar account that will be connected to SmartCal.
- A configured SmartCal salesperson/user.
- Appropriate routing rules for the user.
Important: SmartCal requires the user's calendar connection as part of the booking setup. The Zoom connection is configured separately through the SmartCal setup process.
Step 1: Connect the Calendar and Select Zoom as the Video Meeting Provider
- Sign in to your SmartCal account.
- Open Integrations.
- Connect the calendar account that will be used for SmartCal bookings.
- Under Video Meeting, select Zoom instead of Microsoft Teams.
- Follow the setup link provided by SmartCal to connect your Zoom account.
- Return to SmartCal and confirm that both the calendar and Zoom connections show as connected.
- Go to Users and verify that the appropriate user has Zoom connected.
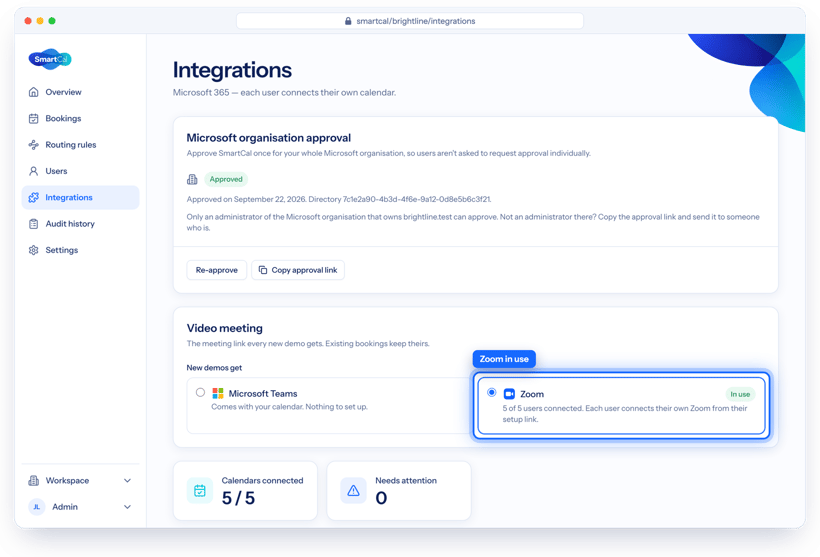
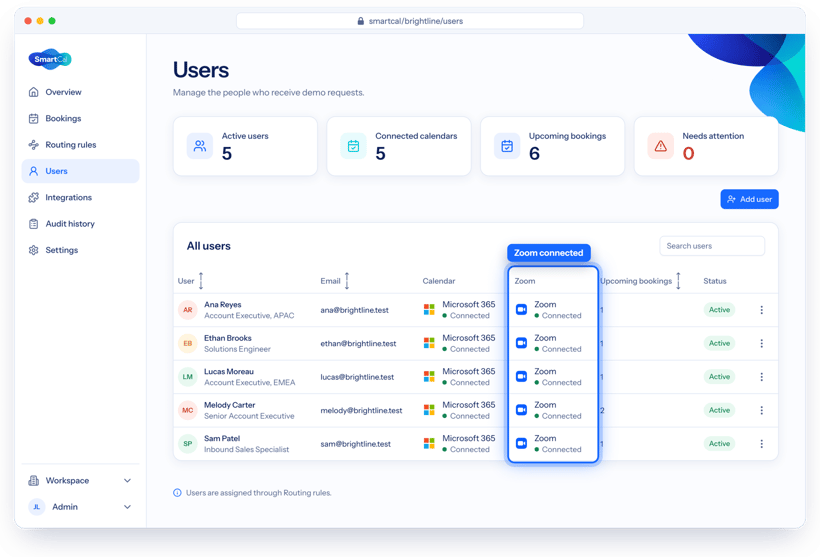
SmartCal supports connecting either Microsoft Teams or Zoom as the video meeting provider. A user can select one provider at a time, not both.
Once the calendar and Zoom are connected, SmartCal can create the booked meeting with the assigned salesperson and the corresponding Zoom meeting link.
Step 2: Configure Routing Rules
- Go to Routing Rules.
- Create or update a routing rule.
- Specify the conditions for the rule, such as country.
- Assign the appropriate salesperson to the rule.
- Save the routing rule.
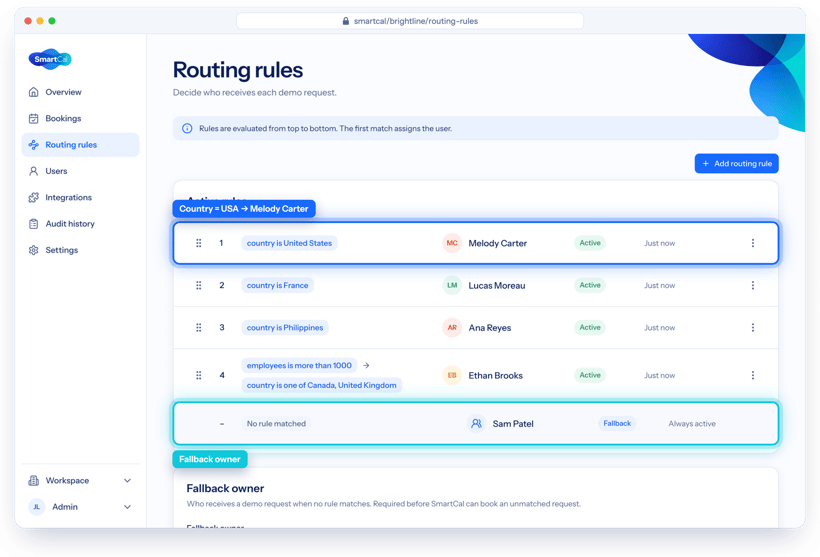
SmartCal evaluates routing rules from top to bottom and assigns the first matching rule. A fallback owner or queue is used when no rule matches.
Step 3: Test a Booking
- Submit a demo request through the SmartCal booking page.
- Confirm that the submission is routed to the expected salesperson.
- Select an available date and time.
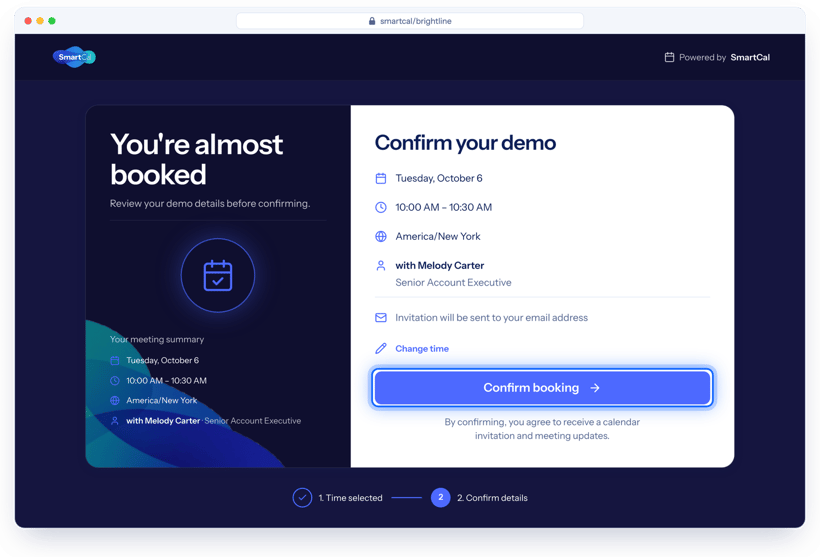
- Review the booking details and confirm the appointment.
- Verify that the confirmation displays the assigned salesperson, date, time, and timezone.
- Verify that the calendar invitation is sent.
- Open the Zoom Calendar and confirm that the meeting was created with a Zoom meeting URL.
Usage
Configure Routing Rules
After connecting the calendar and Zoom, configure the rules that determine which salesperson receives each booking. Go to Routing Rules.
Routing rules can assign bookings based on information submitted by the prospect, such as their country or region.
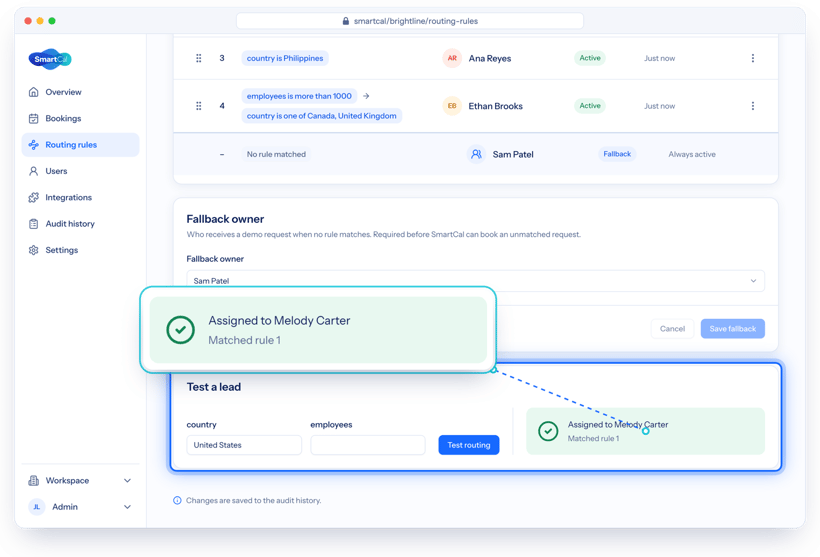
Example: a routing rule can be configured as Country/Region = USA → Melody. This means that a booking submitted with USA as the country can be assigned to the configured salesperson.
SmartCal evaluates routing rules in order and assigns the first matching rule.
Configure a Fallback Owner
SmartCal also provides a Fallback Owner. The fallback owner receives bookings when the submitted information does not match an active routing rule. For example:
| Country | Assigned salesperson |
|---|---|
| USA | Salesperson A |
| France | Salesperson B |
| Philippines | Salesperson C |
| Other/unmatched | Fallback Owner |
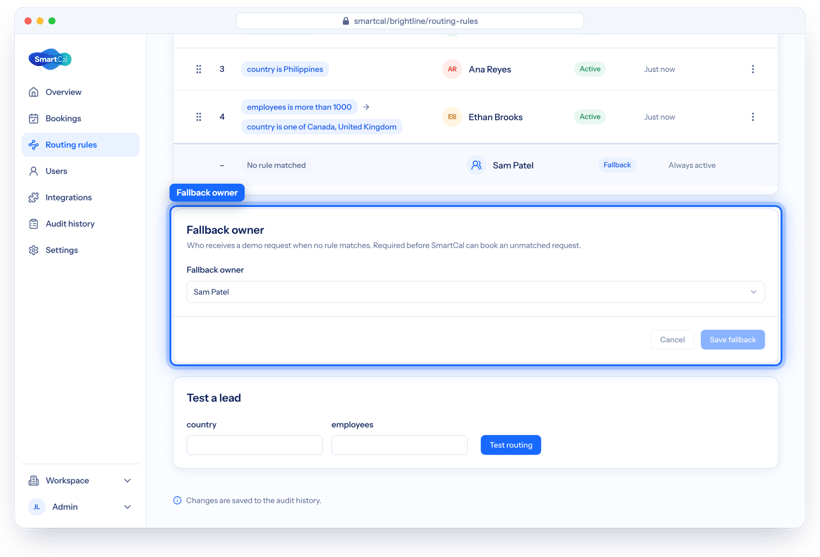
A fallback owner ensures that an unmatched booking is still handled rather than being assigned arbitrarily.
Booking a Meeting with Zoom
Once the calendar and Zoom accounts are connected and routing has been configured, prospects can book a meeting through SmartCal.
Step 1: Open the SmartCal Booking Page
Open the customer's SmartCal booking page. The prospect completes the booking form with the required information, such as:
- Name
- Work email
- Company
- Country/Region
- Additional information
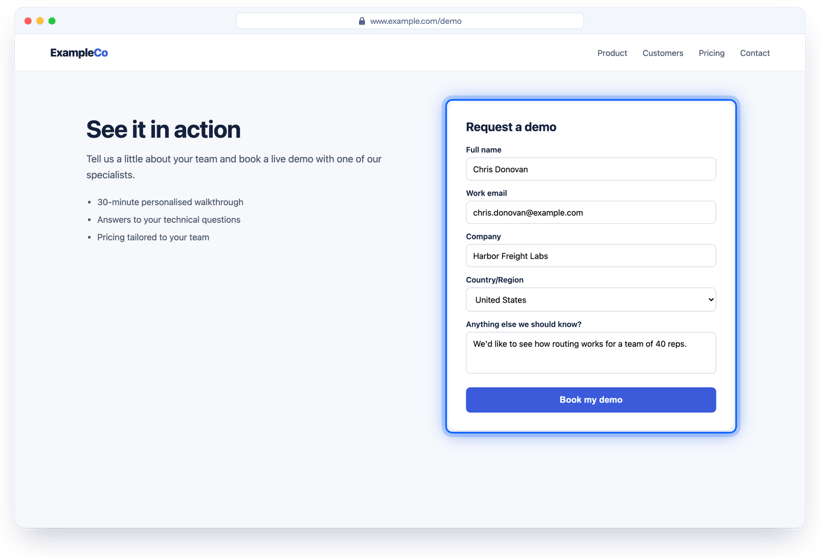
The SmartCal booking page then submits the information for routing.
Step 2: SmartCal Determines the Salesperson
SmartCal evaluates the submitted information against the configured routing rules. If a rule matches, SmartCal assigns the corresponding salesperson. If no rule matches, SmartCal uses the configured fallback owner. The prospect does not manually select the salesperson.
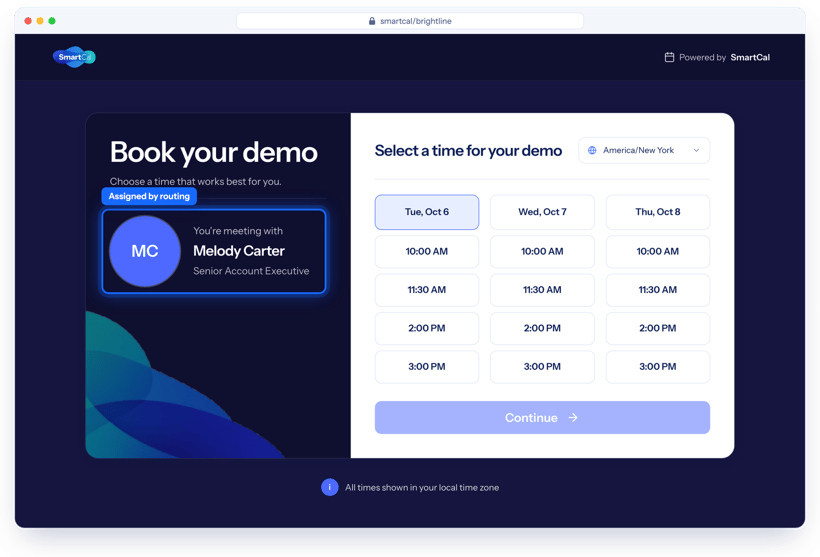
Step 3: Select an Available Time
After routing is completed, SmartCal displays the assigned salesperson and available appointment times. The prospect then selects the preferred date and time.
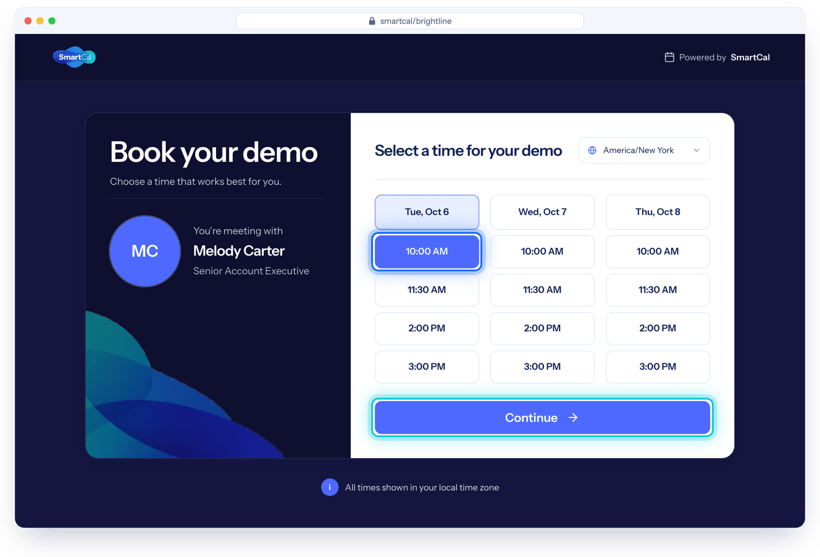
Step 4: Confirm the Booking
After selecting a time, the prospect completes the booking. When successful, SmartCal displays a confirmation screen indicating Your demo is booked. The confirmation also provides the appointment information and indicates that a calendar invitation has been sent.
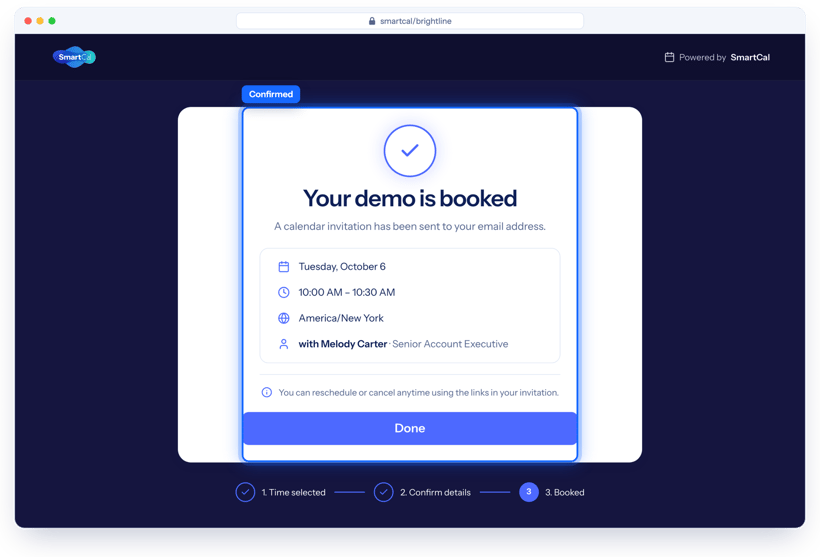
The prospect will also receive an email with the confirmation, the time and date of the meeting, the salesperson they will meet with, the option to add the demo to their calendar, and the option to reschedule or cancel the meeting.
Step 5: Verify the Zoom Meeting
After the booking is confirmed:
- Open the connected Zoom application.
- Navigate to Calendar.
- Locate the newly created booking.
- Open the calendar event.
- Verify the Zoom meeting information and join link.
Switching from Microsoft Teams to Zoom
SmartCal allows the configured video meeting provider to be changed. To switch to Zoom:
- Open SmartCal.
- Go to Integrations.
- Locate Video meeting.
- Select Zoom.
- Return to Users.
- Open or refresh the user's setup link.
- Connect the user's Zoom account.
- Complete a test booking.
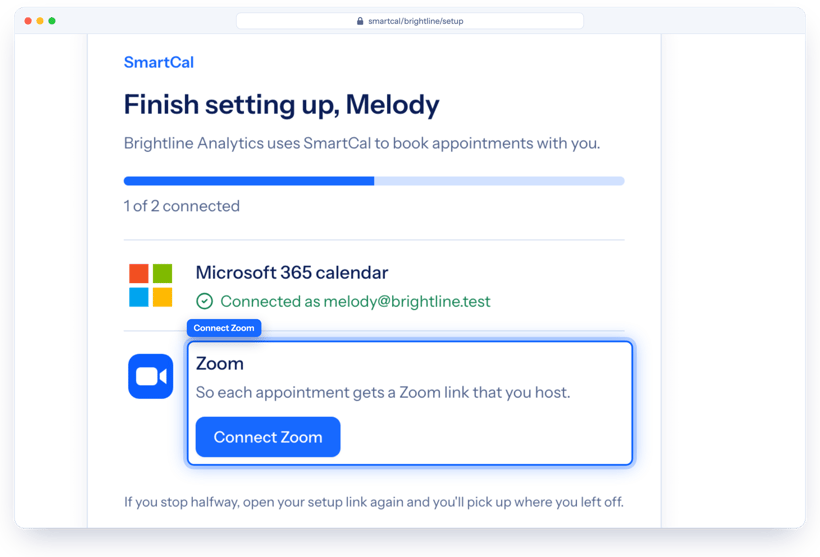
Important: Only one video meeting provider can be active at a time. Selecting Zoom means SmartCal uses Zoom rather than Microsoft Teams for the configured meeting workflow.
Managing Zoom Connections
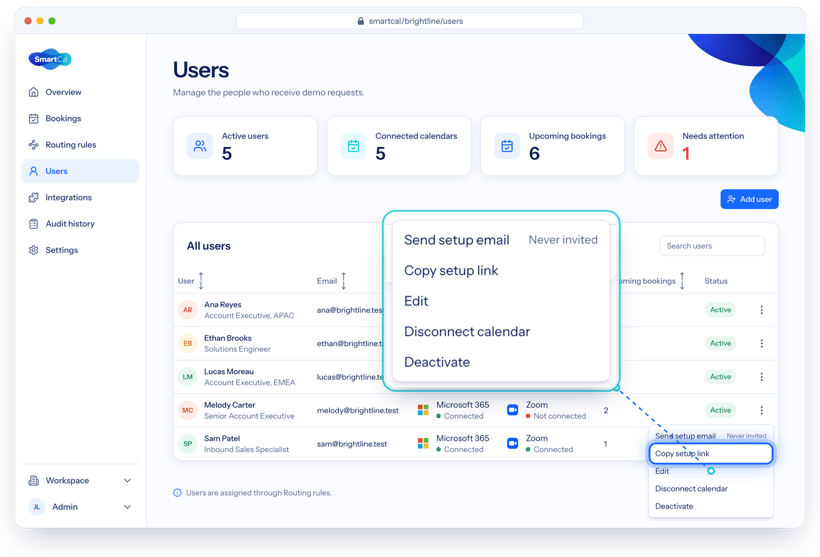
Administrators can manage the connection from the Users and Integrations areas of SmartCal. The Users page shows the configured user's calendar and Zoom connection status. The Integrations page shows the selected video meeting provider and its connection state.
Removing the App
Removing SmartCal from Zoom and disconnecting Zoom from SmartCal are separate actions.
Disconnect Zoom from SmartCal
If you want to stop using Zoom for a SmartCal user:
- Open SmartCal.
- Go to Users.
- Locate the connected user.
- Click the three-dot menu beside the user's status.
- Select Disconnect Zoom.
- Confirm the disconnection if prompted.
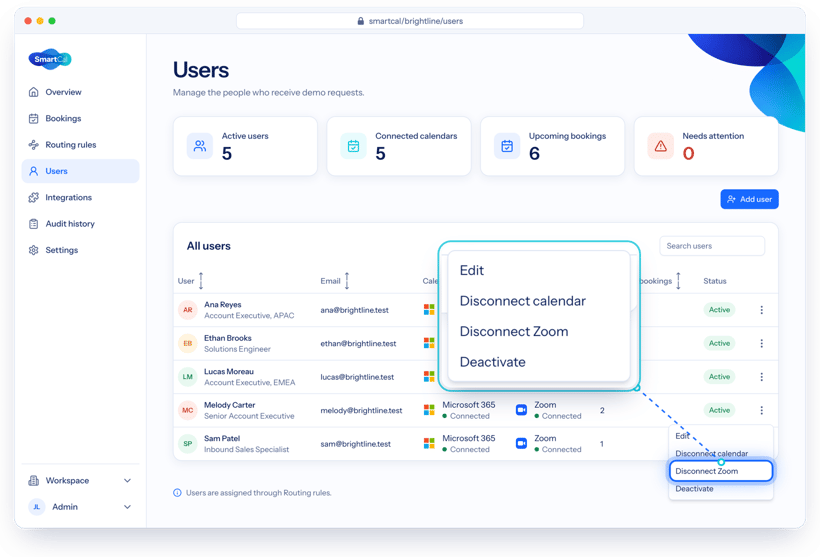
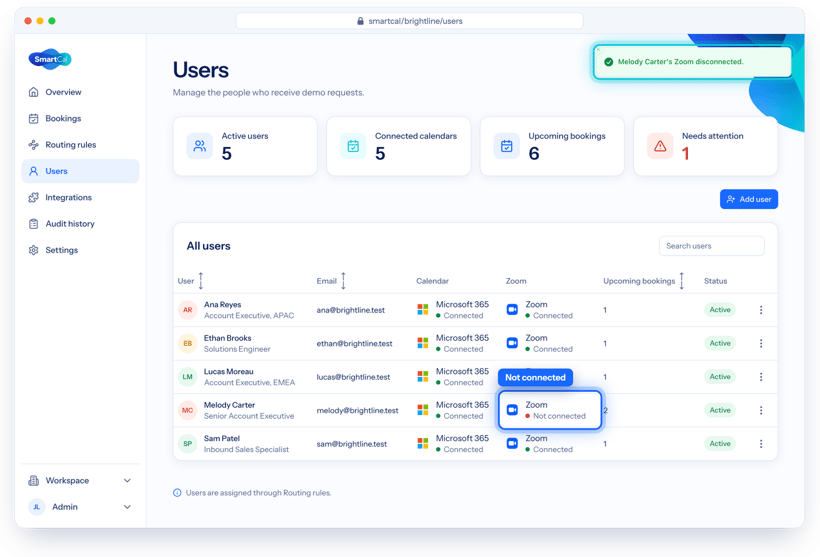
After disconnecting, the Zoom account is no longer connected to that SmartCal user.
Remove SmartCal from Your Zoom Account
To remove SmartCal from your Zoom account:
- Sign in to the Zoom App Marketplace.
- Open My Library.
- Locate SmartCal.
- Open the app's More actions menu.
- Select Remove.
- Confirm the removal.
Zoom's current instructions use My Library → More → Remove for removing an app from an individual Zoom account. For accounts where the app is managed by an administrator, the administrator can remove the app through Marketplace Management → Apps on Account → Added Apps → Manage app → Remove.
What Happens When SmartCal Is Removed?
Removing SmartCal from Zoom prevents SmartCal from continuing to use the user's Zoom authorization. As a result:
- SmartCal can no longer use the removed Zoom connection.
- New Zoom-based bookings should not be configured until the Zoom connection is restored.
- The user can add SmartCal again if the app remains approved and available to the account.
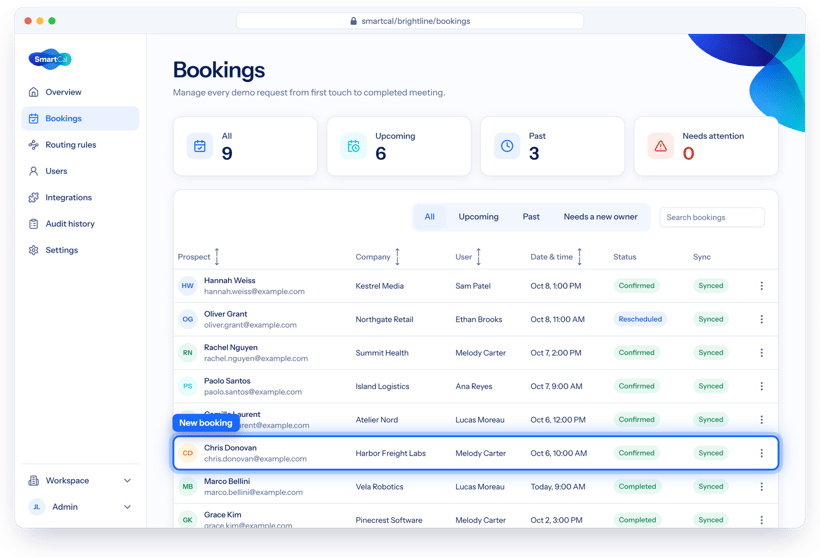
Existing SmartCal data: Removing the Zoom integration does not automatically delete SmartCal booking records. SmartCal maintains its own booking records, including booking status, assigned salesperson, provider identifiers, and audit information.
Data retention and deletion after app removal follow the SmartCal Privacy Policy and the company's applicable data-retention requirements.
Troubleshooting
SmartCal does not appear in Zoom Marketplace
Check that:
- You are signed in to the correct Zoom account.
- You are searching for the correct app name.
- Your organization's Zoom administrator has not restricted Marketplace apps.
- The app has been approved for your account if administrator approval is required.
Zoom administrators can control Marketplace visibility and whether users require approval to add apps.
I see "Request" instead of "Add"
Your Zoom account may require administrator approval before SmartCal can be added. Select Request and follow your organization's approval process.
Zoom is not connected in SmartCal
Check the following:
- Open Integrations.
- Confirm that Zoom is selected under Video meeting.
- Go to Users.
- Open or refresh the user's setup link.
- Complete the Zoom connection.
- Return to SmartCal and verify the connection status.
The SmartCal setup process requires selecting Zoom in Integrations and then completing the user's Zoom connection through the setup flow.
The wrong salesperson receives the booking
Open Routing Rules and check:
- The submitted country/region.
- The active routing rules.
- The order of the rules.
- The salesperson assigned to the matching rule.
- The fallback owner.
SmartCal uses the first matching routing rule. If there is no match, the fallback owner is used.
The booking goes to the fallback owner
This usually means that the submitted information does not match an active routing rule. For example, if USA is not included in any active rule, a USA booking may be assigned to the fallback owner. Add USA to the appropriate routing rule and submit another test booking.
The Zoom meeting does not appear in the calendar
Check that:
- Zoom is connected to the correct SmartCal user.
- Zoom is selected under Integrations → Video meeting.
- The booking was successfully confirmed.
- The connected calendar is active.
- You are checking the correct Zoom account.
After verifying the connection, perform another test booking.
Microsoft Teams and Zoom are both needed
SmartCal currently allows only one video meeting provider to be selected at a time. Go to Integrations → Video meeting and select the provider required for the current configuration.
FAQ
Does SmartCal replace Zoom?
No. SmartCal manages the booking workflow, while Zoom provides the online meeting service selected for the booking.
Can I use Microsoft Teams and Zoom at the same time?
No. SmartCal allows the client to select either Microsoft Teams or Zoom as the video meeting provider.
Does the prospect need a SmartCal account?
No. The SmartCal booking flow is designed for prospects to book meetings without requiring a SmartCal login. Secure management links are provided for rescheduling and cancellation.
Does the prospect choose the salesperson?
No. SmartCal assigns the salesperson using the configured routing rules.
What happens if no routing rule matches?
SmartCal uses the configured fallback owner or queue.
Where can I see the booked Zoom meeting?
Open the connected Zoom application and navigate to Calendar. The SmartCal bookings appear there after the integration is configured.
Can I disconnect Zoom?
Yes. In SmartCal, go to Users, open the user's three-dot action menu, and select Disconnect Zoom.
Can I reconnect Zoom later?
Yes. The Zoom connection can be configured again through the user's SmartCal setup link.
Contact Support
For assistance with SmartCal or the Zoom integration, contact the SmartCal support team through the support channel provided by your organization.
Support URL: https://smartcal.org/support
Support Email: privacy@srpro.marketing
Additional Resources
- SmartCal Privacy Policy: https://smartcal.org/policy
- SmartCal Terms of Use: https://smartcal.org/terms-of-service
- SmartCal Support: https://smartcal.org/support